Background
At the time of this post’s writing, Rancher (an open-source kubernetes cluster manager) v2.0.7 has just landed, and it includes SAML 2.0 support for Ping Identity and Active Directory Federation Services (AD FS). This development comes at the perfect time, as my organization is evaluating whether or not to use Rancher for our production workloads, and we are firm believers in federated identity management through our IdP provider, Okta.
But wait! Why just Ping Identity and AD FS? Isn’t that kind of unusual, given that SAML 2.0 is a standard? Is there something specific to these two implementations?
The short answer is, thankfully, no. After reviewing the relevant portions of the codebase, I can safely say it’s just vanilla SAML. I assume the Rancher team just started with Ping Identity and AD FS because they were the two top requested providers, which I’m sure they took the time to sit down and test against, write up specific integration instructions, screenshots, and so on. But I want to use Okta anyway, dang it! So, let’s go do that.
Configure Rancher
Log into Rancher with an existing local administrator account (the default is, unsurprisingly, ‘admin’). From the ‘global’ context, head over to Security -> Authentication, and select the Microsoft AD FS (yes, even though you aren’t actually going to be using AD FS for your IdP).

Now we tell Rancher which fields to look for in the assertion, and how to map them to user attributes. Okta allows us to specify what field names and values we send to Rancher as part of the setup process for our new SAML 2.0 app, but other IdPs may have pre-defined field names which you must adhere to. Please consult your IdP’s documentation if you have trouble.
I was confused by the ‘Rancher API Host’ field name. After digging around the Rancher source for a bit, I realized it’s literally just the external DNS name for the Rancher service; the same address as you type into your address bar to access your Rancher install.

Rancher’s SAML library includes support for receiving encrypted assertion responses, and appears to require that you furnish it with an RSA keypair for this activity. As a brief aside, I will actually not be enabling the encryption on the IdP side because I think that’s overkill in this use-case (and, frankly, I couldn’t get Okta to play nice with it either). Let’s generate the necessary certificate and key:
openssl req -x509 -newkey rsa:2048 -keyout rancher_sp.key -out rancher_sp.cert -days 3650 -nodes -subj "/CN=rancher.example.com"
Grab the contents of the rancher_sp.key and rancher_sp.cert files and place them into the appropriate configuration blocks (or upload the files from your computer, either way):

Leave that all open in a browser tab; we’ll come back to it shortly. For now, though, we need to go over to Okta.
Configure Okta (or some other IdP)
The rest of these instructions will be Okta-specific, but the concepts are not. Reach out to your IdP provider if you need assistance.
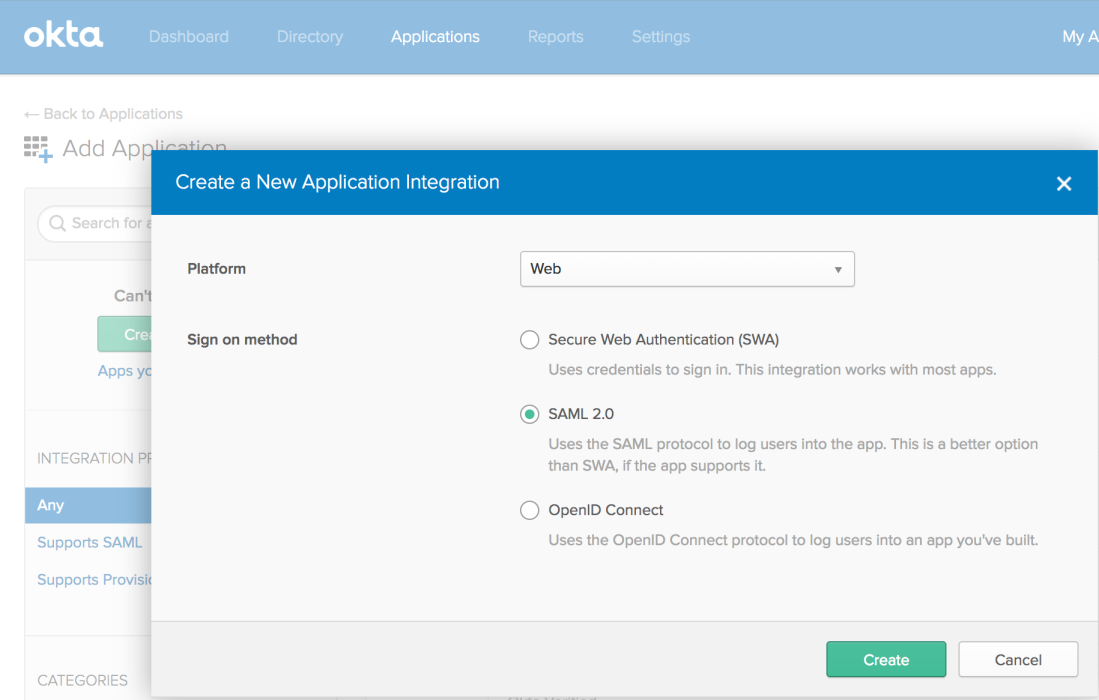
Create a new SAML 2.0 application:

Give it a name and proceed to the SAML settings page.
Single sign on URL:
https://rancher.example.com/v1-saml/adfs/saml/acs

Audience URI (SP Entity ID) (aka Audience Restriction):
https://rancher.example.com/v1-saml/adfs/saml/metadata
You should be able to leave the rest of the general options alone. Create two custom attribute statements. These are how we’ll tell Rancher what username and display name to use.
First attribute statement:
Name: userName
Name Format: Unspecified
Value: user.username

Second attribute statement:
Name: displayName
Name Format: Unspecified
Value: user.firstName + " " + user.lastName
If you haven’t guessed it by now, the user.* declarations are an expression syntax that Okta provides. If you need to use some other values for username/display name, feel free customize the fields Okta uses to fill in these values:
https://developer.okta.com/reference/okta_expression_language/#okta-user-profile
Create a group attribute statement, which will send all the groups you are a member of to Rancher, which will in turn be used to map groups to Rancher roles:
Name: groups
Name Format: Unspecified
Filter: Regex
Value: .*
^ (that's period-asterisk, the regex expression for "match all")
Perhaps you don’t want to send all your group information to your Rancher install; maybe you have a lot of groups not used for authorization for some reason? If that’s the case, you can create your own regular expression to try and ensure you get a tighter match. Do not attempt to restrict access to a given set of groups by using this filter though, as we’ll do that in Rancher directly in a much more user-friendly way.
Double-check that your options look like these options and proceed.

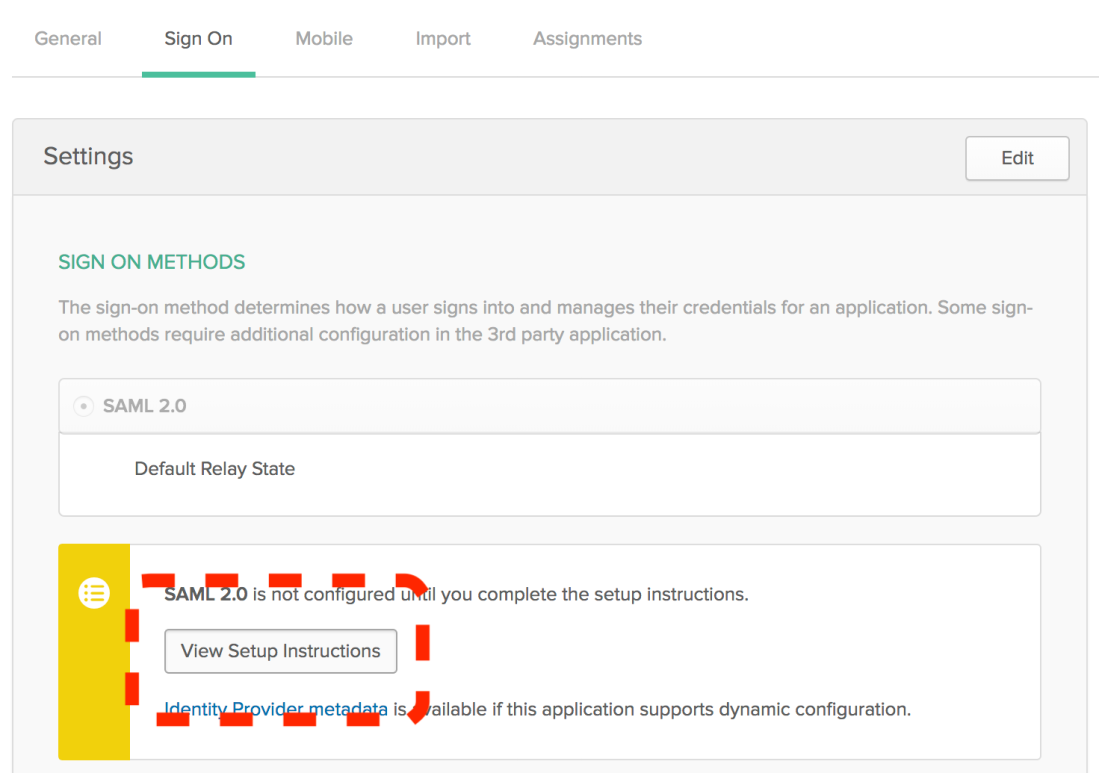
Save your new connector. Once saving is complete, you’ll need to click the ‘Sign-On’ tab and select ‘View Setup Instructions’:

Grab the IdP metadata and put it on your clipboard:

We’ll need it during the next step.
Now before you leave Okta, you need to complete one final task. Make sure you go into the newly-created Rancher SAML 2.0 app and assign it to yourself and anyone else you want to bestow crushing responsibility for production systems onto. If you forget this step, the final steps required later in Rancher’s configuration will fail.
Back to Rancher for the Final Steps
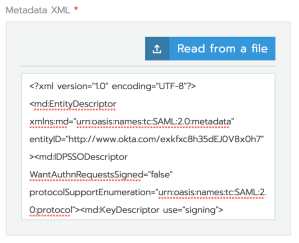
Head back over to that Rancher tab we left open and paste the IdP metadata into the ‘Metadata XML’ box:

Alright, in theory, that’s it. Click the ‘Authenticate with AD FS’ button and say a little prayer. Quick note: if nothing seems to happen, it’s likely because your browser blocked the pop-up. Make sure you disable the pop-up blocker for your Rancher domain and whitelist it in any other extensions you might utilize.
Proceed to sign in to your Okta account if prompted, though it’s likely you are already signed in from the previous steps. If you did everything correctly, you’ll be dropped back to the Rancher authentication page, only this time with some information about your SAML settings. Additionally, hovering over your user icon on the top-right should yield your name and your Okta username. Nifty!

Technically you are done! That said, I would recommend making one more tweak by changing the Site Access settings block to ‘Restrict access to only Authorized Users and Organizations’. This action will disable login from any other non-SAML source, including existing local users, unless the user is listed under the ‘Authorized Users and Organizations’ section, or you’ve explicitly added one of the groups (which are brought over from Okta) that a SAML user is part of. Quick note: Rancher will only know about groups you are a part of (the ones it received from your SAML assertion), which is unfortunately somewhat limiting.

Using Groups for RBAC
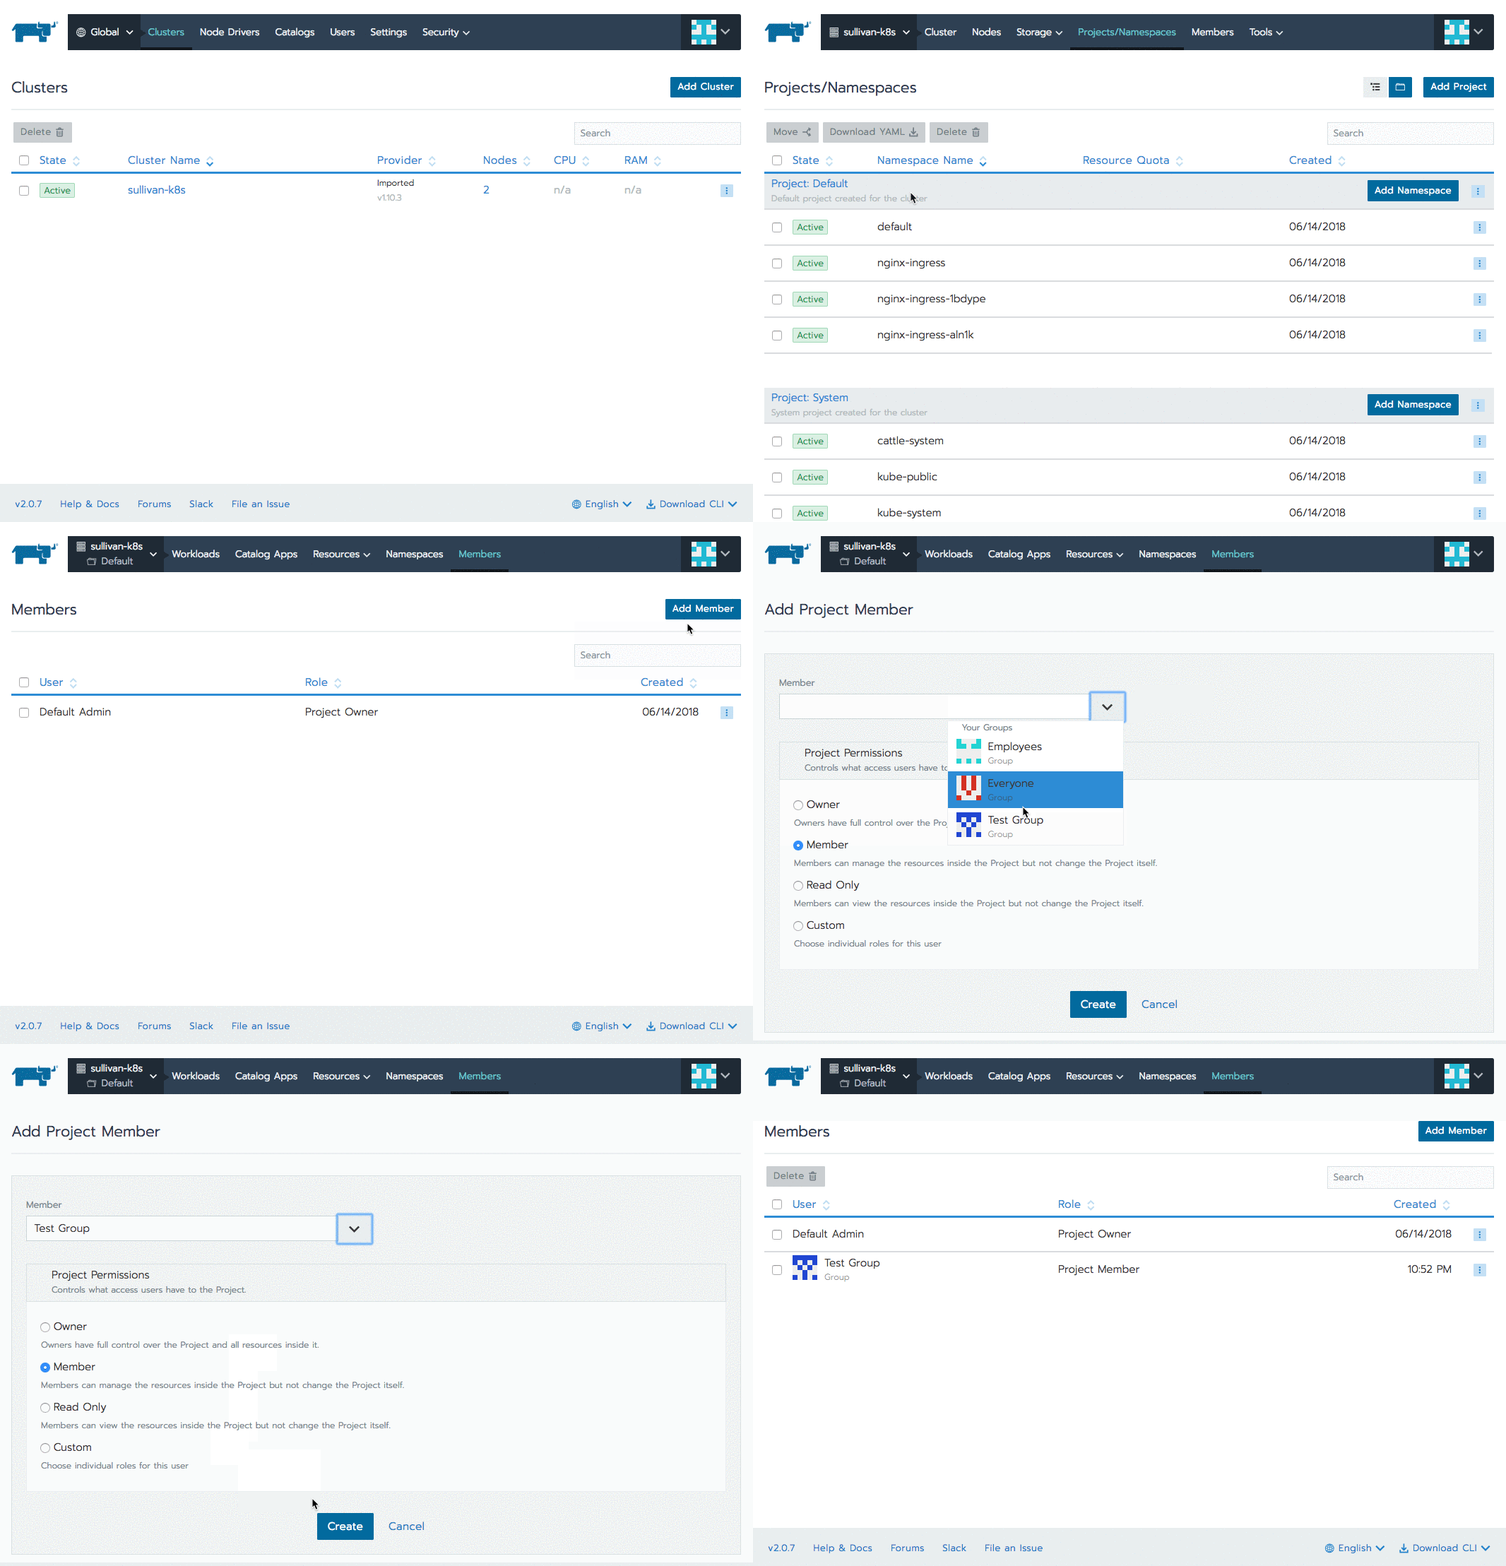
By default, your SAML users will receive no access to anything at all. When they log in, they’ll see no clusters. Let’s change that!
Select a cluster -> Members -> Add Member.

Now your users can see the cluster, but none of the Projects or pods inside. Time to repeat this process by authorizing a group to a particular project:

Conclusion
Rancher is a powerful tool for managing Kubernetes clusters, and the recently-landed SAML 2.0 support (with group awareness!) is a major step forward in terms of making the solution enterprise-ready. I’ve enjoyed working with the software and can’t wait to see where the project goes.
P.S. – if anyone from Rancher is reading this, you have my permission to re-use and re-distribute any screenshots or text in this blog post in any of your internal or customer-facing documentation/blog posts/wiki pages, should you find it useful.

Thanks for this. We are really looking for something like this? Is there a way we can modify the login screen message?
Because even after integrating with OKTA. Login screen still says “Login with AD FS” its kinda weird. ANy solution you are aware of.
LikeLike
At the moment, there is not. That said, official Okta support is planned for the 2.2 release, which should be out in the beginning of 2019.
LikeLike
Great article! I was able to integrate Okta following this step-by-step. Our only issue is when clicking on the icon on the user’s Okta dashboard, it redirects to https:///v1-saml/adfs/saml/acs and we’re given a 403 “Forbidden” message. Did you bump up against that? Thanks again.
LikeLike
Great question. This is caused by an issue with Okta providing an invalid RelayState to Rancher. The work-around is to go to Rancher directly and click ‘Log In with AD FS’. Okta will be an officially-supported IdP in Rancher 2.2, which is releasing in February. You can follow progress here: https://github.com/rancher/rancher/pull/17236
LikeLike
Understood. Thanks for the reply.
LikeLike
What exactly do you mean when you say “go to Rancher directly”. I’m having this exact same problem and see at least one other comment in the Rancher Slack about hitting this forbidden message during SAML setup.
LikeLike
Instead of going to okta and clicking the chiclet, navigate to https://your-rancher-url.com and click “Log In with AD FS”.
LikeLike
Log In with AD FS is not available as an option until you complete the ADFS integration. I’m also not using okta but Shibboleth as my SAML IdP. I saw someone on Rancher Slack using ADFS and getting the forbidden issue when trying to setup auth so maybe it’s an issue in the current Rancher release?
LikeLike
I have never encountered the ‘forbidden’ message during AD FS setup, only after setup has completed. There’s likely some other misconfiguration at play, or perhaps just an incompatibility with Shibboleth. Sadly, all I know is Okta and can’t really speak to other IdP configurations.
LikeLike
I ended up solving it. If you are logged in and trying to setup auth using the ip address and not the hostname this occurs. Make sure when setting up auth to be logged into Ranger using the hostname and not the ip address when setting up auth. I was using the ADFS option for setting up SAML and it worked for Shibboleth.
LikeLike
Have you tried creating a new cluster in Rancher after configuring SAML auth? It fails for us on the SAML redirects.
LikeLike