Using Okta (and other SAML IdPs) with Rancher 2.0


Background

At the time of this post’s writing, Rancher (an open-source kubernetes cluster manager) v2.0.7 has just landed, and it includes SAML 2.0 support for Ping Identity and Active Directory Federation Services (AD FS).  This development comes at the perfect time, as my organization is evaluating whether or not to use Rancher for our production workloads, and we are firm believers in federated identity management through our IdP provider, Okta.

But wait! Why just Ping Identity and AD FS? Isn’t that kind of unusual, given that SAML 2.0 is a standard? Is there something specific to these two implementations?

The short answer is, thankfully, no.  After reviewing the relevant portions of the codebase, I can safely say it’s just vanilla SAML.  I assume the Rancher team just started with Ping Identity and AD FS because they were the two top requested providers, which I’m sure they took the time to sit down and test against, write up specific integration instructions, screenshots, and so on.  But I want to use Okta anyway, dang it!  So, let’s go do that.

Configure Rancher

Log into Rancher with an existing local administrator account (the default is, unsurprisingly, ‘admin’).  From the ‘global’ context, head over to Security -> Authentication, and select the Microsoft AD FS (yes, even though you aren’t actually going to be using AD FS for your IdP).

Screen Shot 2018-08-14 at 8.39.22 PM

Now we tell Rancher which fields to look for in the assertion, and how to map them to user attributes.  Okta allows us to specify what field names and values we send to Rancher as part of the setup process for our new SAML 2.0 app, but other IdPs may have pre-defined field names which you must adhere to. Please consult your IdP’s documentation if you have trouble.

I was confused by the ‘Rancher API Host’ field name.  After digging around the Rancher source for a bit, I realized it’s literally just the external DNS name for the Rancher service; the same address as you type into your address bar to access your Rancher install.

Screen Shot 2018-08-14 at 8.50.32 PM

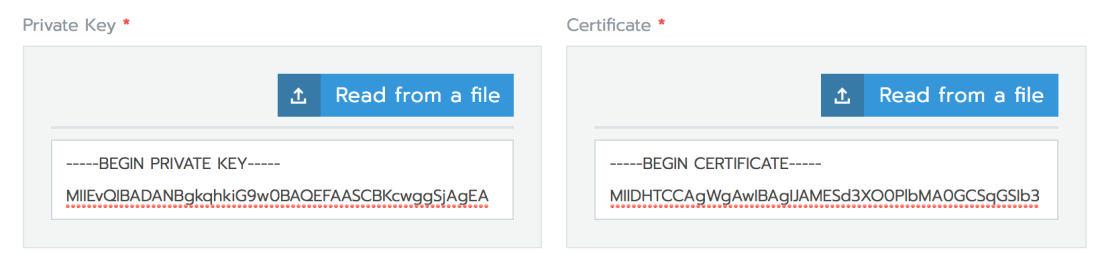
Rancher’s SAML library includes support for receiving encrypted assertion responses, and appears to require that you furnish it with an RSA keypair for this activity.  As a brief aside, I will actually not be enabling the encryption on the IdP side because I think that’s overkill in this use-case (and, frankly, I couldn’t get Okta to play nice with it either).  Let’s generate the necessary certificate and key:

openssl req -x509 -newkey rsa:2048 -keyout rancher_sp.key -out rancher_sp.cert -days 3650 -nodes -subj "/CN=rancher.example.com"

Grab the contents of the rancher_sp.key and rancher_sp.cert files and place them into the appropriate configuration blocks (or upload the files from your computer, either way):

Screen Shot 2018-08-14 at 8.49.17 PM.png

Leave that all open in a browser tab; we’ll come back to it shortly.  For now, though, we need to go over to Okta.

Configure Okta (or some other IdP)

The rest of these instructions will be Okta-specific, but the concepts are not. Reach out to your IdP provider if you need assistance.

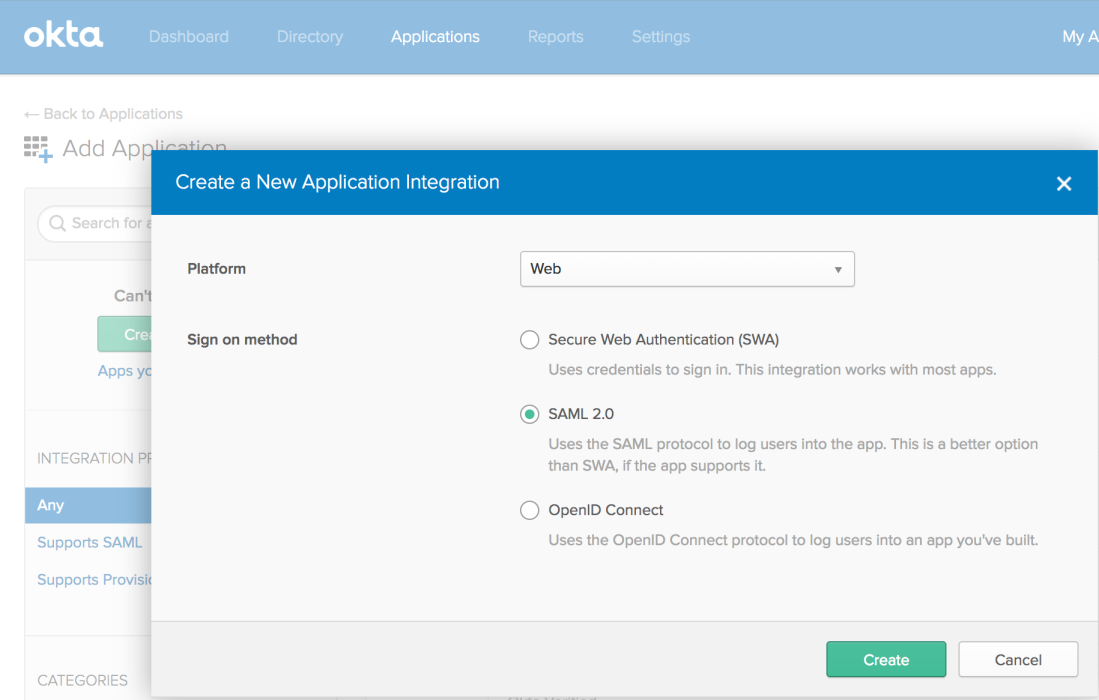
Create a new SAML 2.0 application:

Screen Shot 2018-08-14 at 8.58.13 PM.png

Give it a name and proceed to the SAML settings page.

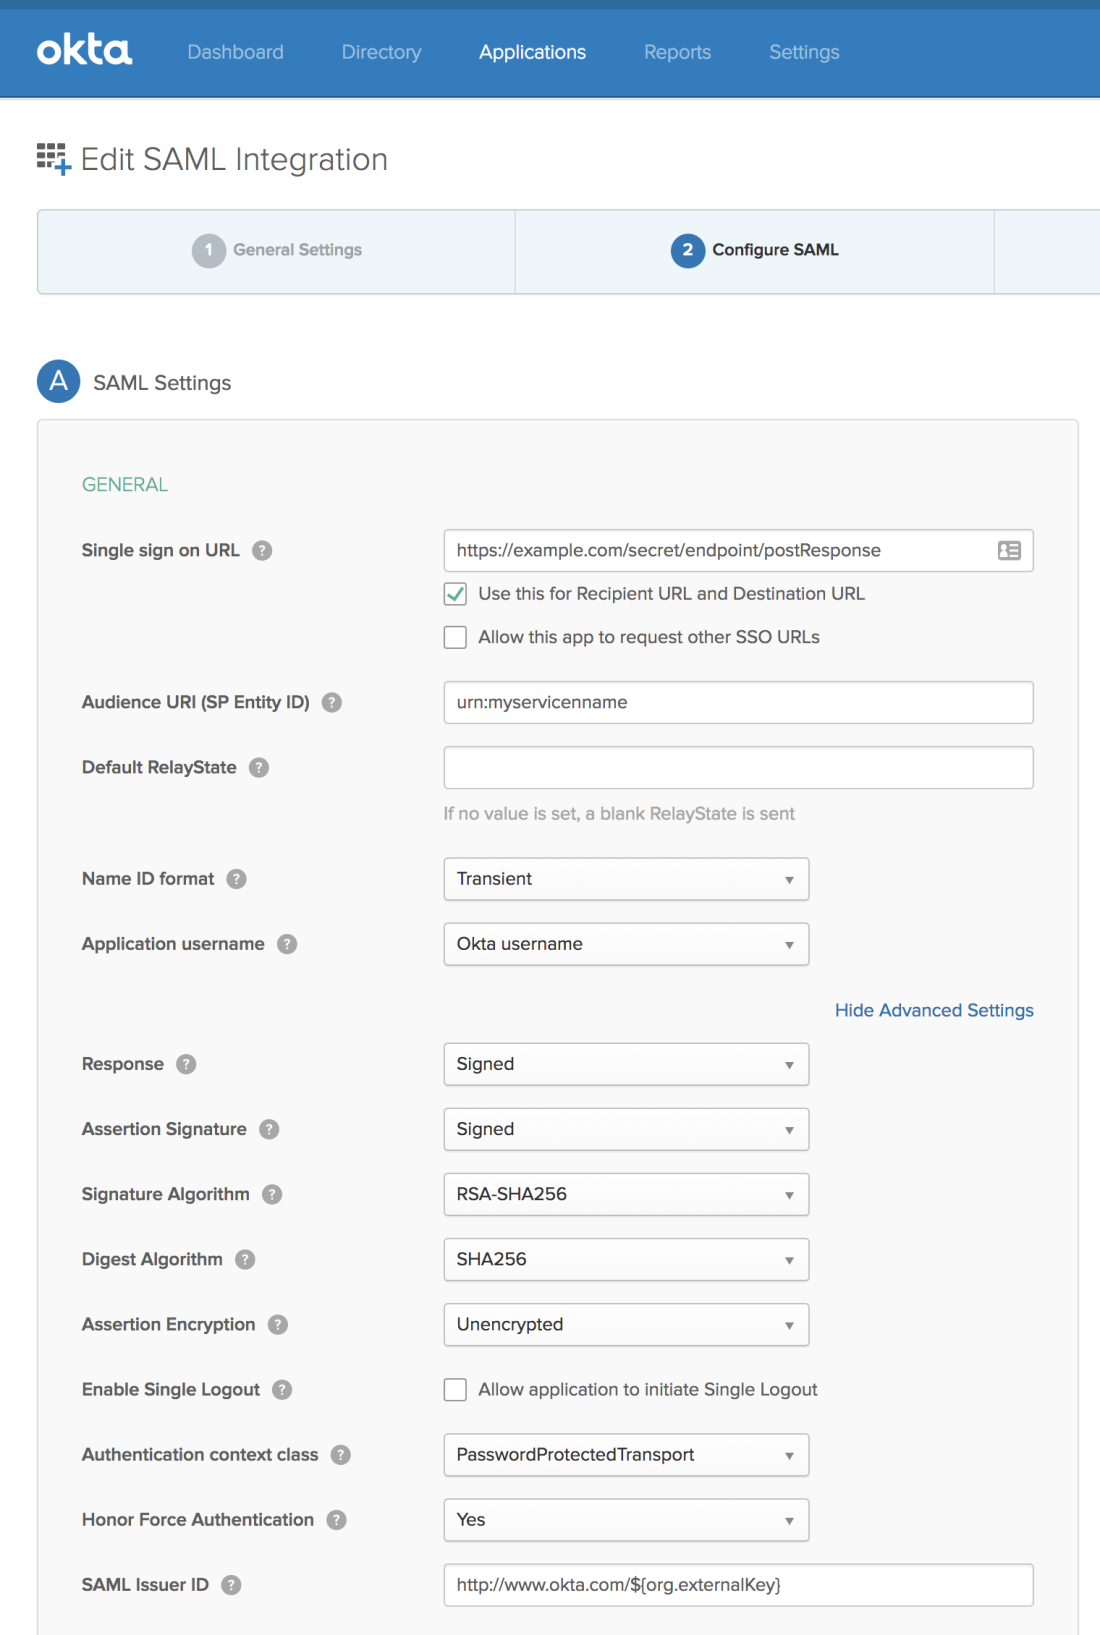
Single sign on URL:
https://rancher.example.com/v1-saml/adfs/saml/acs

Audience URI (SP Entity ID) (aka Audience Restriction):
https://rancher.example.com/v1-saml/adfs/saml/metadata

You should be able to leave the rest of the general options alone.  Create two custom attribute statements.  These are how we’ll tell Rancher what username and display name to use.

First attribute statement:
Name: userName
Name Format: Unspecified
Value: user.username

Second attribute statement:
Name: displayName
Name Format: Unspecified
Value: user.firstName + " " + user.lastName

If you haven’t guessed it by now, the user.* declarations are an expression syntax that Okta provides.  If you need to use some other values for username/display name, feel free customize the fields Okta uses to fill in these values:
https://developer.okta.com/reference/okta_expression_language/#okta-user-profile

Create a group attribute statement, which will send all the groups you are a member of to Rancher, which will in turn be used to map groups to Rancher roles:

Name: groups
Name Format: Unspecified
Filter: Regex
Value: .*
^ (that's period-asterisk, the regex expression for "match all")

Perhaps you don’t want to send all your group information to your Rancher install; maybe you have a lot of groups not used for authorization for some reason?  If that’s the case, you can create your own regular expression to try and ensure you get a tighter match.  Do not attempt to restrict access to a given set of groups by using this filter though, as we’ll do that in Rancher directly in a much more user-friendly way.

Double-check that your options look like these options and proceed.

screencapture-workiva-admin-oktapreview-admin-apps-saml-wizard-create-2018-08-14-21_03_11.png

Save your new connector.  Once saving is complete, you’ll need to click the ‘Sign-On’ tab and select ‘View Setup Instructions’:

Screen Shot 2018-08-14 at 9.22.26 PM.png

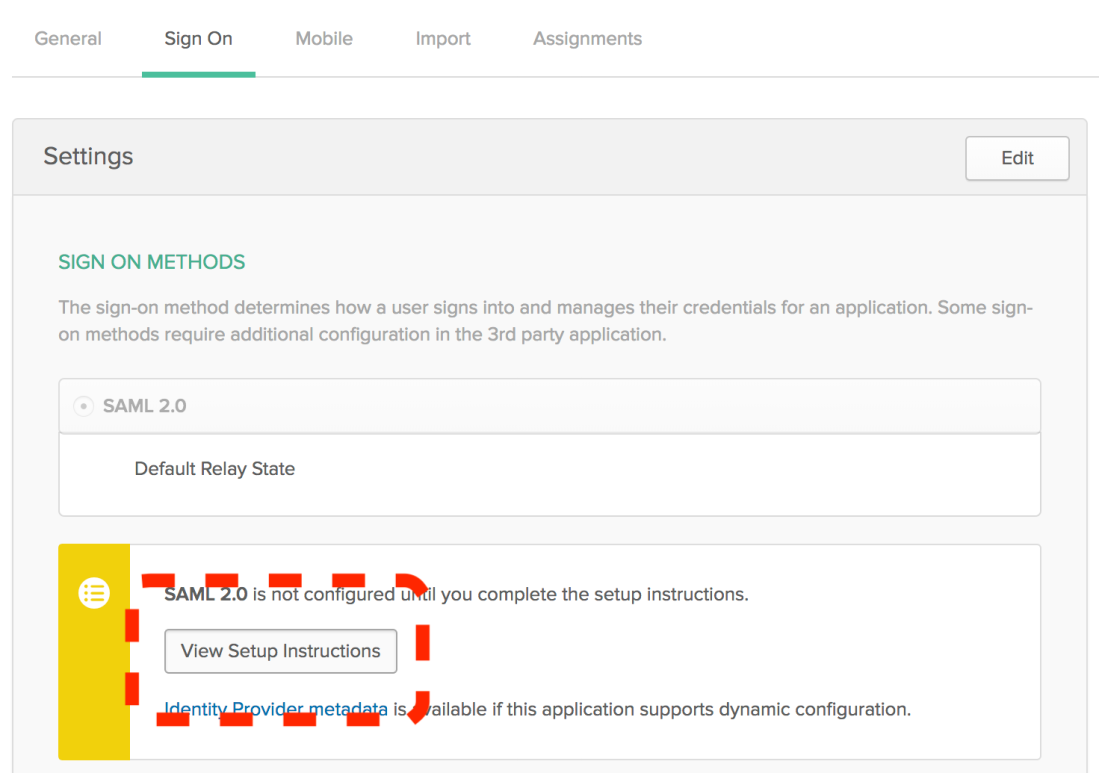
Grab the IdP metadata and put it on your clipboard:

screen-shot-2018-08-07-at-2-24-29-pm.png

We’ll need it during the next step.

Now before you leave Okta, you need to complete one final task.  Make sure you go into the newly-created Rancher SAML 2.0 app and assign it to yourself and anyone else you want to bestow crushing responsibility for production systems onto.  If you forget this step, the final steps required later in Rancher’s configuration will fail.

Back to Rancher for the Final Steps

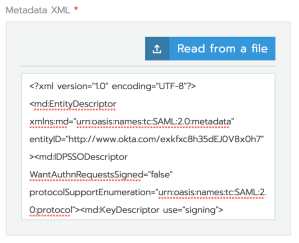
Head back over to that Rancher tab we left open and paste the IdP metadata into the ‘Metadata XML’ box:

Screen Shot 2018-08-14 at 9.28.42 PM

Alright, in theory, that’s it.  Click the ‘Authenticate with AD FS’ button and say a little prayer.  Quick note: if nothing seems to happen, it’s likely because your browser blocked the pop-up.  Make sure you disable the pop-up blocker for your Rancher domain and whitelist it in any other extensions you might utilize.

Proceed to sign in to your Okta account if prompted, though it’s likely you are already signed in from the previous steps.  If you did everything correctly, you’ll be dropped back to the Rancher authentication page, only this time with some information about your SAML settings.  Additionally, hovering over your user icon on the top-right should yield your name and your Okta username.  Nifty!

Screen Shot 2018-08-14 at 9.43.21 PM.png

Technically you are done!  That said, I would recommend making one more tweak by changing the Site Access settings block to ‘Restrict access to only Authorized Users and Organizations’.  This action will disable login from any other non-SAML source, including existing local users, unless the user is listed under the ‘Authorized Users and Organizations’ section, or you’ve explicitly added one of the groups (which are brought over from Okta) that a SAML user is part of.  Quick note: Rancher will only know about groups you are a part of (the ones it received from your SAML assertion), which is unfortunately somewhat limiting.

Screen Shot 2018-08-14 at 9.49.14 PM.png

Using Groups for RBAC

By default, your SAML users will receive no access to anything at all.  When they log in, they’ll see no clusters.  Let’s change that!

Select a cluster -> Members -> Add Member.

OlgS3FmPR2.gif

Now your users can see the cluster, but none of the Projects or pods inside.  Time to repeat this process by authorizing a group to a particular project:

cWADmDIuxh.gif

Conclusion

Rancher is a powerful tool for managing Kubernetes clusters, and the recently-landed SAML 2.0 support (with group awareness!) is a major step forward in terms of making the solution enterprise-ready.  I’ve enjoyed working with the software and can’t wait to see where the project goes.

P.S. – if anyone from Rancher is reading this, you have my permission to re-use and re-distribute any screenshots or text in this blog post in any of your internal or customer-facing documentation/blog posts/wiki pages, should you find it useful.

Protecting internal applications with a SAML-aware reverse-proxy (a tutorial)

Problem

My employer wholly embraces the coffee-shop model for employee access, which can induce a bit of stress if your job is to protect company resources.  Historically, we have had to support some applications that:

  1. Don’t support SAML (or whatever flavor of federation you prefer)
  2. Probably wouldn’t be exposed outside of the firewall/VPN at most companies because they were never designed to be Internet-facing

We are an enterprise, but only had a small handful of these ‘naughty’ systems. It wasn’t super cost-effective to jump into a 1500+ employee seat contract with Duo (now Cisco), Cloudflare Access, or ScaleFT Zero Trust Web Access1 just to solve this particular problem across a small number of hosts. Yet, employees were frustrated that most day-to-day operations did not require jumping on a corporate VPN until you had to reach one of these magical systems.

Solution

I designed a SAML-aware reverse-proxy using a combination of Apache 2.4, mod_auth_mellon, and a sprinkling of ModSecurity to add some rate limiting capabilities.  The following examples assume Ubuntu 16.04, but you can use whatever OS you’d like, assuming you know how to get the requisite packages.

Install dependencies and enable Apache modules

sudo apt-get install apache2, libapache2-mod-auth-mellon, libapache2-modsecurity
sudo a2enmod proxy_http proxy ssl rewrite auth_mellon security2

Configure ModSecurity

Our ModSecurity install will do one thing and one thing only: rate limit (by IP) access attempts by non-authenticated users.

Create or overwrite /etc/modsecurity/modsecurity.conf and put the following content:

# A minimal ModSecurity configuration for rate limiting
# on a large number of HTTP 401 Unauthorized responses.
SecRuleEngine On
SecRequestBodyAccess On
SecRequestBodyLimit 13107200
SecRequestBodyNoFilesLimit 131072
SecRequestBodyInMemoryLimit 131072
SecRequestBodyLimitAction ProcessPartial
SecPcreMatchLimit 1000
SecPcreMatchLimitRecursion 1000
SecResponseBodyMimeType text/plain text/html text/xml
SecResponseBodyLimit 524288
SecResponseBodyLimitAction ProcessPartial
SecTmpDir /tmp/
SecDataDir /tmp/
SecAuditEngine RelevantOnly
SecAuditLogRelevantStatus "^(?:5|4(?!04))"
SecAuditLogParts ABIJDEFHZ
SecAuditLogType Serial
SecAuditLog /var/log/apache2/modsec_audit.log
SecArgumentSeparator &
SecCookieFormat 0
SecUnicodeMapFile unicode.mapping 20127
SecStatusEngine On

# ====================================
# Rate limiting rules below
# ====================================

# RULE: Rate-Limit on HTTP 401 response codes
# Set IP address value to a variable
SecAction "phase:1,initcol:ip=%{REMOTE_ADDR},id:'1006'"
# On HTTP status 401, increment a counter (block_script), and expire that value out of cache after 300s
SecRule RESPONSE_STATUS "@streq 401" "phase:3,pass,setvar:ip.block_script=+1,expirevar:ip.block_script=300,id:'1007'"
# On counter variable (block_script) being greater than or equal to '20', deny with HTTP 429 Too Many Requests
SecRule ip:block_script "@ge 20" "phase:3,deny,severity:ERROR,status:429,id:'1008'"

Feel free to add your own ModSecurity rules if you’d like to do things like detecting/blocking remote shell attempts, SQL injection, etc, but that’s not something I intend to cover here.

Modify the site (vhost) configuration

In case it’s non-obvious, in the following commands feel free to change out ‘myservicename’ with an appropriate identifier for service you are protecting with this gateway setup.

Head over to /etc/apache2/sites-enabled and open the vhost config file you intend to add protection to (or modify the default one, if this is a new install).

<IfModule mod_ssl.c>
 <VirtualHost _default_:443>
  ServerAdmin webmaster@localhost
  [...]
  # MSIE 7 and newer should be able to use keepalive
  BrowserMatch "MSIE [17-9]" ssl-unclean-shutdown

  ProxyRequests Off
  ProxyPass /secret/ !

  # If fronting a locally-installed app, just forward to
  # the correct listening port. Alternatively,
  # you can address a system on another domain and port.
  ProxyPass / https://127.0.0.1:8000/ retry=10
  ProxyPassReverse / https://127.0.0.1:8000/

  ErrorDocument 401 "\
<html>\
<title>Access Restricted</title>\
<body>\
<h1>Access is restricted to organizational users.</h1>\
<p>\
<a href=\"/secret/endpoint/login?ReturnTo=/\"><strong>Click here to login via single sign-on, or wait for 2 seconds to be redirected automatically.<strong></a><br /><br /><br /><br /><a href=\"/#noredirect\">Temporarily disable redirection.</a>if(window.location.hash == \"\") { window.setTimeout(function(){ window.location.href = \"/secret/endpoint/login?ReturnTo=\" + encodeURIComponent(window.location.pathname + window.location.search); }, 2000); }\
</p>\
</body>\
</html>"

  <Location />
   # Documentation on what these flags do can be found in the docs:
   # https://github.com/Uninett/mod_auth_mellon/blob/master/README.md
   MellonEnable "info"
   AuthType "Mellon"
   MellonVariable "cookie"
   MellonSamlResponseDump On
   MellonSPPrivateKeyFile /etc/apache2/mellon/urn_myservicename.key
   MellonSPCertFile /etc/apache2/mellon/urn_myservicename.cert
   MellonSPMetadataFile /etc/apache2/mellon/urn_myservicename.xml
   MellonIdpMetadataFile /etc/apache2/mellon/idp.xml
   MellonEndpointPath /secret/endpoint
   MellonSecureCookie on
   # session cookie duration; 43200(secs) = 12 hours
   MellonSessionLength 43200
   MellonUser "NAME_ID"
   MellonDefaultLoginPath /
   MellonSamlResponseDump On

   # This 'requirement' is actually going to be
   # optional. We also give some trusted IPs below,
   # and tell Apache we can fulfill either requirement.
   Require valid-user
   Order allow,deny

   # This is where you can whitelist IPs or
   # even entire network ranges, perfect for
   # systems that still need to accept
   # some API traffic from known networks.
   Allow from 10.20.30.0/24
   Allow from 10.10.110.66

   # Allow one of the above to be good enough.
   # You could change this to 'all' if you need
   # to satisfy SSO required AND valid network
   # required.
   Satisfy any
  </Location>

  <Location /secret/endpoint/>
   AuthType "Mellon"
   MellonEnable "off"
   Order Deny,Allow
   Allow from all
   Satisfy Any
  </Location>

 </VirtualHost>
</IfModule>

Create SAML SP metadata files

We’ll download and use a shell script from the mod_auth_mellon authors to create the necessary SP metadata files:

sudo mkdir -p /etc/apache2/mellon/
cd /etc/apache2/mellon/
wget https://raw.githubusercontent.com/Uninett/mod_auth_mellon/master/mellon_create_metadata.sh
bash mellon_create_metadata.sh urn:myservicename https://<YOURDOMAIN>/secret/endpoint

Now your directory structure should resemble the following:

msulliv@c0995a102f21:/etc/apache2/mellon/# ls
mellon_create_metadata.sh urn_myservicename.cert urn_myservicename.key urn_myservicename.xml

mellon_create_metadata.sh is no longer needed and can be deleted, if you so choose.

Create the SAML 2.0 application profile on your IdP

Go to your identity provider and provision the new application. For this example, I’m using Okta (who I highly recommend):

screencapture-workiva-admin-oktapreview-admin-apps-saml-wizard-edit-webfilings_samlgateway_1-2018-08-07-14_21_25.png

Place SAML IdP metadata

Finally, grab the IdP metadata and put it on your clipboard:

Screen Shot 2018-08-07 at 2.24.29 PM.png

Drop its contents into a new file at /etc/apache2/mellon/idp.xml:

msulliv@c0995a102f21:/etc/apache2/mellon# cat idp.xml
<?xml version="1.0" encoding="UTF-8"?>
<md:EntityDescriptor xmlns:md="urn:oasis:names:tc:SAML:2.0:metadata" entityID="http://www.okta.com/exkd2n9ujpQFaUq8f0h7">
<md:IDPSSODescriptor WantAuthnRequestsSigned="false" protocolSupportEnumeration="urn:oasis:names:tc:SAML:2.0:protocol">
<md:KeyDescriptor use="signing">
<ds:KeyInfo xmlns:ds="http://www.w3.org/2000/09/xmldsig#">
<ds:X509Data>
<ds:X509Certificate>MIIDBzCCAe+gAwIBAgIJAJAD/4DMpp7vMA0GCSqGSIb3DQEB
[...]

Restart Apache and Test

sudo systemctl reload apache2

Now head to your application and check out the results:

Screen Shot 2018-08-07 at 2.49.31 PM

Redirected to an auth challenge – perfect!

Extending it further

Quickly adding SAML support to PHP/Python/Rails/Node/etc apps on the same host

In your organization’s homegrown applications where an existing Apache 2 server is acting as a front-end, this same principle can be used to quickly add SAML support. In your vhost config in the Mellon options, add:

<Location />
 [...]
 RequestHeader set Mellon-NameID %{MELLON_NAME_ID}e

In your application, simply check for a value in this header and use it if present. For instance, in Python’s Flask framework:

@login_manager.request_loader
def load_user_from_request(request):

    nameid = request.headers.get('Mellon-NameID')
    if nameid:
        user = User.query.filter_by(username=nameid).first()
        if user:
            return user
        else:
            # Provision user's account for first use 
            user = User(nameid)
            return user

    # return None if method did not login the user
    return None

Back-end on another host

Some applications, like Splunk, can receive login user information via request header (note: Splunk now supports SAML natively, but it still makes for a good example app).  We can direct mod_auth_mellon to send this header along with the information about an authenticated user. Mellon populates the field ‘MELLON_NAME_ID’ with the IdP username ([email protected]) after successful authentication.

In your vhost config in the Mellon options, add:

<Location />
 [...]
 # Pass Splunk a request header declaring the user who has logged in
 # via SAML. The regex test at the end of this line ensures that
 # MELLON_NAME_ID is not an empty string before attempting to set
 # the SplunkWebUser header to the value of MELLON_NAME_ID.
 # Splunk unfortunately freaks out if the SplunkWebUser header is
 # declared but it has no value.
 RequestHeader set SplunkWebUser %{MELLON_NAME_ID}e "expr=-n %{env:MELLON_NAME_ID}"

Be careful to make sure your back-end application is only accessible via this reverse-proxy though, otherwise someone with local network access could simply send the back-end server requests directly with this header to bypass authentication entirely2. In Splunk’s case, that’s what the values under ‘trustedIP’ in $SPLUNK_HOME/etc/system/local/web.conf are for.

Footnotes

1. ScaleFT’s overall offering appears to be very enticing, and I see their recent acquisition by Okta as a great development. Because it addresses several other pain points, we are actively working to deploy ScaleFT at my organization, which will likely replace the home-grown solution described in this post.

2. Do your part to prevent data breaches by seeking assistance from someone with relevant security experience if you are unsure whether or not your back-end application on another host is properly protected from such an attack.